As organizations experience growth and expansion, the demand for efficient resource management becomes even more crucial. Kubernetes, an open-source platform renowned for effectively managing containerized workloads and services, provides an exceptional solution through its robust multi-tenancy options.
With its advanced capabilities, Kubernetes multi-tenancy empowers organizations to optimize resource allocation, enhance scalability, and streamline operations, ultimately driving productivity and success.
But what are these Kubernetes multi-tenancy options, and how can they benefit your organization? Let’s dive in and explore.
What is Multi-Tenancy?
Before diving into the specific options, it’s crucial to grasp the concept of multi-tenancy. In software architecture, multi-tenancy represents a paradigm where multiple customers, often called “tenants,” share a single instance of an application. This approach allows for the efficient allocation of resources and cost reduction, as each user’s workload and data are isolated from one another.
By implementing this resource-sharing practice, organizations can optimize resource usage, enhance scalability, and streamline operational efficiency, ultimately driving better outcomes for their business.
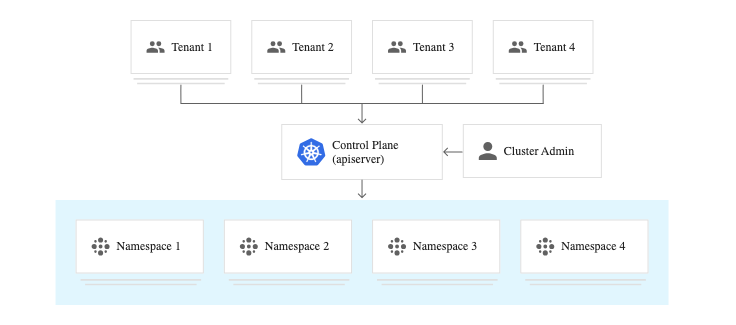
Namespace-Level Tenancy
One of the primary ways to share a Kubernetes cluster for multi-tenancy is by utilizing Namespaces. In the context of Kubernetes, a Namespace represents a virtual cluster within the Kubernetes cluster. It acts as a logical boundary that allows different tenants or teams to have their isolated environment.
Each tenant or team is assigned their own Namespace, providing them a private space to run and manage their applications, ensuring better control and security. This segregation promotes efficient resource allocation, facilitates collaboration, and enhances overall cluster management.
Advantages of Namespace-level Tenancy
With Namespace-level Kubernetes multi-tenancy, you gain isolation. Pods in one Namespace cannot directly interact with those in another unless explicitly allowed. This method simplifies administration, as resources within a Namespace can be managed individually. However, it’s worth noting that as a tenant, you may not be able to debug issues with your infrastructure since you can’t see the systems around you.
Virtual Cluster Multi-Tenancy
The second primary way to achieve multi-tenancy in Kubernetes is through virtual clusters. This approach involves creating a virtual cluster for each tenant within the physical cluster. By implementing virtual clusters, tenants can enjoy more autonomy and control over their environment.
Each virtual cluster operates independently, providing a dedicated space for tenants to manage their workloads, resources, and configurations. This segregation ensures that tenants can customize their settings and make decisions that best suit their specific requirements.
With virtual clusters, Kubernetes enables a scalable and efficient multi-tenant architecture, empowering organizations to optimize resource utilization and enhance overall system performance.
Benefits of Virtual Cluster Multi-Tenancy
Virtual cluster multi-tenancy provides a higher level of isolation compared to Namespace-level tenancy. It allows for greater customization and control, as each tenant can manage their virtual cluster independently. This method also provides better security, as tenants are entirely isolated from one another.
What are the different Kubernetes multi-tenancy options? – In Conclusion
Kubernetes multi-tenancy offers two main multi-tenancy options: Namespace-level tenancy and Virtual Cluster Multi-tenancy. Both methods provide isolation and efficient resource usage, but they differ in terms of control and flexibility.
Your choice would depend on your organization’s specific needs and circumstances. So, whether you’re a small team looking to optimize resource usage or a large enterprise aiming for better isolation and control, Kubernetes multi-tenancy options have covered you.